Disclaimer: This is a description of how I did it with my J1 → J1s upgraded model. You might have a different revision or variant. I may or may not be able to help you with your variant — it depends on how well I can simulate these differences.
If you need support, please go to https://www.reddit.com/r/KlipperOnJ1/
The installation bundle can be downloaded from https://github.com/eazrael/klipper4j1/releases
Important fix for "Timer too close" on 0.0.3 & 0.0.4 installations, see Disable Linux Debug output
¶ Credits
The Klipper macros and configs are based heavily on the work of
¶ Requirements
Hardware
- USB-A to USB-A cable (from HTC Vive, USB hubs, etc.), USB 2.0 is sufficient, USB-C to USB-A may work, but untested.
- Linux computer with ~20GB free space for backup and the storage image, a RasPi with USB Stick or SD-card will work
- Keyboard (or disassemble the printer...)
- USB FAT32 formatted stick/thumb drive with 1MB free (or disassemble the printer...)
¶ Installation
¶ Overview
- Install necessary tools on a Linux computer (any Raspberry Pi will do).
- Install the J1 EDL Booter app on the display and boot it into EDL mode. (EDL, "Emergency Download Mode", is a low-level mode built into the display's Qualcomm chip that lets a connected computer read and write its internal flash storage directly — it's how the stock Android system gets replaced.)
- Connect the display to your linux computer via the J1 front USB port (USB-A to USB-A)
- Create a backup of your display's storage, create a new image, and flash it to the display
- Setup display
- Flash microcontroller
- Calibrate Heaters, offset, etc
- Setup printer in OrcaSlicer
Of course you are free to do the changes in any order.
None of this requires opening the printer case — the EDL Booter app reaches EDL mode from the touchscreen, and the microcontroller is flashed later over SSH once Klipper is running. Disassembly is only needed as a fallback and is covered in the Recovery section at the end of this guide.
¶ What can and cannot be undone
- Every step in this guide including the display flash and up to the MCU flash is fully recoverable if you follow the instructions: keep the backup you create in "Install display image" and you can restore the original Snapmaker Android system at any time.
- Flashing the MCU is the last step and the only real point of no return in this process. You cannot create a backup of the original MCU firmware yourself without an STLinkV2 adapter connected to the MCU, so this guide cannot revert it for you. Recovery may be possible by reflashing the original Snapmaker Android system back to the display — it may be able to reflash the MCU itself — but this is not guaranteed and not covered by this guide. Or you need the stock firmware image, the flash tool can flash it, too
- Aside from that, the bootloader protects itself: unless you use an STLinkV2, a failed or interrupted MCU flash cannot brick it, it will just wait in the bootloader for you to try again.
¶ Linux preparation
Please note that lines starting with # indicates a root shell and $ is used for a normal user shell.
Make sure the following base software is installed (most of it is normally already there):
- dd
- sfdisk
- bash
- tar
- xz
- losetup
- python3
Create a work directory and install edl into it. Follow the instructions in the README of the github repository.
This is how I did this on Ubuntu & Armbian:
$ mkdir work
$ cd work
$ git clone https://github.com/bkerler/edl
$ cd edl
$ git submodule update --init --recursive
$ python3 -m venv "$(pwd)"
$ source bin/activate
$ pip3 install -r requirements.txt
AFAIR I did not need to install any drivers or rebuild the initrd.
Note: edl needs raw USB access. Either run it as root (as shown later in this guide) or install the udev rules described in the edl README.
About source bin/activate: this activates the Python virtual environment (venv) created above, which is where edl and its dependencies are installed. It only affects your current shell, so you have to run it again in every new terminal session or after switching to a root shell — this guide repeats the command at every step that needs it. Once active, your shell prompt gets a (venv) prefix; that's how you can tell it's still active.
Download the latest installation_bundle from https://github.com/eazrael/klipper4j1/releases to the work directory and untar it:
$ cd ~/work
$ tar -xf installation_bundle.tar.xz
$ cd installation_bundle
$ ls -al
Output:
create_image.sh
idex_calibrate.3mf
j1_android_edl_rebooter.apk
lk2nd.img
mainsailos.img
orcaslicer_vendor_profile.zip
README.md
split_update.sh
Verify the extraction before you continue. Check with ls -l that all files listed above are present and that mainsailos.img has its full size (~5 GiB). On some systems (this happened on a Raspberry Pi) tar can fail silently, leaving files missing or truncated — usually because the xz tools are missing or the disk ran out of space. A truncated mainsailos.img will produce a broken flash image later.
¶ File Contents
| create_image.sh | Script to create a new flash image |
| idex_calibrate.3mf | Model for calibrating second extruder XY offsets |
| j1_android_edl_rebooter.apk | Android app ("J1 EDL Booter") installed on the display to reboot it into Qualcomm EDL mode from the touchscreen |
| lk2nd.img | Bootloader (lk2nd is a secondary bootloader that makes it possible to boot a non-Android OS, like the Armbian/Klipper system used here, on Qualcomm-based Android hardware) |
| mainsailos.img | OS Image |
| orcaslicer_vendor_profile.zip | OrcaSlicer vendor profile bundle (Klipperized printer profiles) |
| README.md | Readme |
| split_update.sh | Script to extract linux_boot and linux_root partition images for upgrading an existing installation, see Upgrade section |
¶ Boot into EDL mode
There are two ways to get the display into EDL mode ("Emergency Download Mode", the low-level mode built into the display's Qualcomm chip that lets a connected computer read and write its internal flash storage directly):
- Android app (no disassembly needed): Copy
j1_android_edl_rebooter.apkfrom the installation bundle onto a FAT32-formatted USB stick and plug it into the front USB port. You need a keyboard to get into the Android settings menu in the first place; from there on the touchscreen works fine and is more convenient than the keyboard. Install the apk from the stick, open it, and tap "Boot into EDL". See the J1 EDL Booter guide for details. Disconnect any USB device from the printer before tapping "Boot into EDL", and keep the printer powered on. - Disassembly (hardware fallback): Open the printer and press the EDL test button/pad on the display PCB directly. See "Manual EDL entry (disassembly)" in the Recovery section at the end of this guide, then come back here.
Either way, the display reboots straight into EDL mode: the screen stays dark while it waits for a USB connection. Once you're here, continue with "Install display image" below.
¶ Install display image
With the display in EDL mode, plug the USB-A to USB-A cable between the J1's front USB port and your Linux computer. This powers the mainboard and possibly the chamber LED (total power draw ~1.5 Watt); the display screen itself stays black.
On the Linux system, check with lsusb the devices found
# lsusb
Output:
Bus 004 Device 001: ID 1d6b:0003 Linux Foundation 3.0 root hub
Bus 003 Device 005: ID 05c6:9008 Qualcomm, Inc. Gobi Wireless Modem (QDL mode)
Bus 003 Device 001: ID 1d6b:0002 Linux Foundation 2.0 root hub
Bus 002 Device 002: ID 090c:1000 Silicon Motion, Inc. - Taiwan (formerly Feiya Technology Corp.) Flash Drive
Bus 002 Device 001: ID 1d6b:0003 Linux Foundation 3.0 root hub
Bus 001 Device 001: ID 1d6b:0002 Linux Foundation 2.0 root hub
When you see the Gobi Wireless Modem, you booted into the EDL mode and can read and write the internal flash. If it does not work then disconnect and try again. The LED in the J1 might be turned on & flicker, especially during transfers, but it's harmless.
First backup the full flash of the display. You need it to create the new Klipper image and you can revert later to the original snapmaker firmware if you need to. The following commands are run as root because edl needs raw USB access (see the note in the Linux preparation section).
# cd work/edl
# source bin/activate
(venv) # ./edl rf backup-20260228.img
Output:
Qualcomm Sahara / Firehose Client V3.62 (c) B.Kerler 2018-2025.
main - Trying with no loader given ...
main - Waiting for the device
main - Device detected :)
main - Mode detected: firehose
Dumping flash with sector count 15269888 as backup-20260228.img.
Progress: ....
Progress: |██████████| 100.0% Read (Sector 0xE90000 of 0xE90000, ) 22.20 MB/s
Dumped flash with sector count 15269888 as backup-20260228.img.
This will download the flash memory from the display computer and store it in a file named backup-20260228.img, feel free to use a different file name. Keep this file for restoring the Android system later if you wish to do so.
If ./edl fails with "command not found", make sure you're in the edl directory (cd work/edl) and that the venv is active ((venv) prefix in the prompt, see the note in "Linux preparation" above). If it fails with a permission error accessing the USB device, make sure you're running it as root, or install the udev rules from the edl README as mentioned earlier.
¶ Create new flash image
This step will create a new image from your backup. This is necessary both because firmware blobs and other binaries are required which I cannot redistribute, so they are taken from your image, and to repartition the storage to make more usable space available. Root is no longer required for this step.
Copy the backup image you created to the installation directory. Then run the create_image.sh script which will create a new image. You need roughly 20GiB of disk space for this, 2x 8GiB images and ~4-5GiB for the MainsailOS Image.
If you are unfamiliar with Linux: the command below is split across several lines with \ for readability. Enter it as shown, or omit the backslashes and put everything on one line.
$ cd installation_bundle
$ mv ../edl/backup-20260228.img .
$ bash create_image.sh \
    backup-20260228.img \
    mainsailos.img \
    lk2nd.img \
    snapmakerj1_klipper.img
Output:
....
New image snapmakerj1_klipper.img created. Check output for errors
Break down of the files involved:
| backup-20260228.img | Image you extracted from the printer, keep it safe |
| mainsailos.img | Mainsail OS Image in the installation bundle |
| lk2nd.img | Bootloader from the installation bundle |
| snapmakerj1_klipper.img | Generated image for flashing into the printer |
¶ Flashing the new image
Copy the generated image to the edl directory or use the full path to the edl program. Remember to source bin/activate again if it is no longer active. Run edl and flash it:
# source bin/activate
(venv) # ./edl wf snapmakerj1_klipper.img
Output:
Qualcomm Sahara / Firehose Client V3.62 (c) B.Kerler 2018-2025.
main - Trying with no loader given ...
main - Waiting for the device
main - Device detected :)
main - Mode detected: firehose
firehose
firehose - [LIB]: Sector size in XML 4096 does not match disk sector size 512
modules
modules - [LIB]: 'Logger' object has no attribute 'loglevel'
Progress: |██████████| 100.0% Write (Sector 0xE8E800 of 0xE90000, ) 27.48 MB/s
Progress: |██████████| 100.0% Write (Sector 0xE8F000 of 0xE90000, ) 27.46 MB/s
Progress: |██████████| 100.0% Write (Sector 0xE8F800 of 0xE90000, ) 27.50 MB/s
Progress: |██████████| 100.0% Write (Sector 0xE90000 of 0xE90000, ) 27.28 MB/s
Wrote snapmakerj1_klipper.img to sector 0.
You can use the same command to flash your backup back to the display (./edl wf backup-20260228.img) if you want to return to the original Snapmaker firmware. This fully restores the display. If you have already flashed Klipper to the MCU by then, note that reverting the MCU is not covered by this guide — see "What can and cannot be undone" above.
Disconnect the USB cable and power on the printer. You should see Armbian booting and after some time you should see Klipperscreen. Please note that the display may be dark for a couple of seconds or you may see the Linux terminal for some seconds. Just wait.
KlipperScreen will say that it cannot connect to the MCU, but the network configuration screen should be accessible.
¶ Display Setup
In KlipperScreen you can setup the WiFi.
If you prefer wired LAN, just plugin a USB network adapter into the front port of the J1. You can also use a USB hub (e.g. for LAN adapter, STLinkV2, USB thumbdrive, etc..). In a DHCP enabled network, it should come up automatically, you can see the IP address in Klipperscreen if needed. Hostname might be snapmakerj1.
You can login with SSH, user is “pi” and password “armbian” (may change in the future). It's an armbian/debian based system, so feel free to install what you need. Sudo is set up, use armbian as password.
Mainsail is set up as Web UI, just navigate with your browser there.
¶ Time zone
The printer boots with its time zone set to UTC. To set it to your own, log in via SSH and run:
$ sudo dpkg-reconfigure tzdata
This opens a menu to select your region and city; the system clock is updated accordingly once you confirm.
¶ Host name
The printer's default host name is snapmakerj1. Armbian does not pick up its host name from DHCP/DNS, so to change it, log in via SSH and run:
$ sudo hostnamectl set-hostname newname
Then reboot for it to take effect everywhere (e.g. in the SSH prompt and mDNS/Avahi announcements).
¶ Flash the microcontroller
Reminder: this is the last step in the guide and the only point of no return. Every earlier step is recoverable if you followed the instructions, but a backup dump of the original MCU firmware is not possible without an STLinkV2 adapter connected to the MCU. If you need to revert this step, recovery may be possible by reflashing the original Snapmaker Android system back to the display — it may be able to reflash the MCU itself — but this is not guaranteed and not covered by this guide. The bootloader protects itself though: a failed or interrupted flash cannot brick the MCU, it will just wait in the bootloader for a retry.
My recommendation is to shutdown Klipper before doing any flash. I prefer to shutdown Klipper with the stop klipper in the Web UI.
Login to the OS via ssh and navigate to the klipper directory. For the initial flash use the command make j1flash-initial:
$ cd ~/klipper
$ make j1flash-initial
Output:
  Flashing out/klipper.bin from klipper via SACP
...
  Flashing complete, restart klipper
The flashing may fail randomly due to some internal timeouts. In case of errors, wait 30 seconds and try again.
When reflashing after a successful klipper flash, use the command make j1flash instead. The only difference is that it sends klipper into the bootloader for flashing.
Important: When during powerup the chamber LED pulses, the bootloader awaits flashing. Run make j1flash-initial in this case, but the other command will also work albeit it takes longer.
Start the klipper service again. It should connect to the MCU.
¶ Setup OrcaSlicer
Tested with OrcaSlicer 2.4.2.
The installation bundle contains orcaslicer_vendor_profile.zip, a vendor profile bundle that adds "SnapmakerJ1" as a printer vendor to OrcaSlicer, with the Klipperized printer profiles. Extract the zip into one of the following profile folders:
- OrcaSlicer's own installation profile folder (bundles the vendor for all users of that installation), or
- your user profile folder in the OrcaSlicer app data directory (adds the vendor just for your user).
| OS | Installation profile folder | User appdata profile folder |
|---|---|---|
| Windows | <OrcaSlicer install dir>\resources\profiles |
%APPDATA%\OrcaSlicer\system |
| macOS | OrcaSlicer.app/Contents/Resources/profiles (inside the app bundle) |
~/Library/Application Support/OrcaSlicer/system |
| Linux | resources/profiles next to the OrcaSlicer binary (location depends on how it was installed, e.g. inside an extracted AppImage) |
~/.config/OrcaSlicer/system |
After extracting, (re)start OrcaSlicer. In the printer selection you should now find the "SnapmakerJ1" vendor with the Klipperized printer profiles.
Note: Copy and Mirror mode are separate printer profiles, and each only exposes a single configurable filament/extruder slot. This is because OrcaSlicer (and Cura too) doesn't really support Copy/Mirror mode and does not generate any commands for the second extruder — so the second extruder's filament/settings must (or should) simply match the first.
¶ Calibrate Printer
The z-offset can be calibrated via the display, but you still need a piece of paper
Calibrate the left extruder. Then do steps 9 and 10.
To calibrate the left extruder (the good ol' way):
- Make sure both nozzles are clean with no filament residue below the nozzles.
- Heat up the print bed to the usual printing temperature.
- Home all axes.
- Move the left extruder to the center of the print bed, coordinates (x= 175, y=100)
- Raise/Lower the print bed to ~5mm.
- Put a piece of paper under the nozzle
- Slowly close the distance between the print bed and nozzle until the paper moves with a bit of friction. In Mainsail you can make finer movements by entering position values directly. Take the final z-position. Edit the printer.cfg, and subtract your final z value (which may be negative) from the position_endstop and position_max values. Save, restart Klipper and verify the position
- Position the extruder nozzle over the leveling knobs, put a piece of paper between print bed and nozzle and adjust the distance until the piece of paper moves with a slight friction.
- Switch to the right extruder (command: T1) and move it to the center (x=175, y=100). Loosen the screws keeping the hotend in place. Raise the print bed carefully to position
- Use the wheel on the extruder to lower or raise the nozzle. Measure with a paper sheet the height as with the first nozzle. Tighten the screws afterwards.
¶ XY-Offset Second Extruder
The automated XY-Offset calibration is not implemented, so this is a manual step.
Use the idex_calibrate.3mf model from the installation bundle. It's an already merged version of XY calibration by “LMaker” at https://www.printables.com/model/129617-offset-xy-dual-extruder-idex-calibration, there is also an explanation how to read the results.
In short
- Print the lower part of the model with the left extruder and the upper part with the right extruder.
- On the printed model you will see two axes with bars.
- Find on each axis the bar which is perfectly aligned, either on the plus side or minus side. The offset is the 0-based index of that bar multiplied by 0.1, negative on the minus side. Example: if the third bar on the minus side matches, its 0-based index is 2, so the offset is 2 * -0.1 = -0.2.
- Edit the printer.cfg file, you can do this from the Web UI.
- Find the lines
variable_right_nozzle_adjust_x: 0andvariable_right_nozzle_adjust_y: 0. Subtract the offset you calculated from the current value. - Save, Restart Klipper, print again and the first bars on each axis should be aligned.
¶ Other Calibration
Calibrate the heaters with the command PID_CALIBRATE.
Do the calibrations provided by OrcaSlicer in your preferred order.
¶ Configuration Files
hardware.cfg and macros.cfg in ~/printer_data/config are symlinks to the copies in ~/Klipper, so they get updated whenever you update Klipper via git. Klipper, Moonraker and Mainsail (and any of the other web UIs) all refuse to write to a symlinked file, so these two files show up as read-only in the Web UI's config editor.
Most customization does not need touching these files directly — put overrides in printer.cfg or one of the other files it includes instead.
If you do need to edit hardware.cfg or macros.cfg directly, replace the symlink with a real copy first:
$ cd ~/printer_data/config
$ cp --remove-destination "$(readlink hardware.cfg)" hardware.cfg
$ cp --remove-destination "$(readlink macros.cfg)" macros.cfg
Note that this breaks the link to ~/Klipper, so the copies will no longer be updated by a Klipper git update — you'll need to reapply your changes (or re-create the symlink) after updating.
¶ Full System Upgrade
Both upgrade paths below wipe all user data on the display (printer.cfg changes, macros, history, etc.) — back up anything you want to keep before starting.
¶ Upgrading from 0.0.3 or earlier to 0.0.4
Upgrading from 0.0.3 or earlier to 0.0.4 is not possible in place. This is the only case where you need your original backup-*.img from the initial install. You need to do a full reinstall: create a new image from that original backup with create_image.sh, and flash it. This wipes and replaces the whole display storage.
$ cd installation_bundle
$ bash create_image.sh \
    backup-20260228.img \
    mainsailos.img \
    lk2nd.img \
    snapmakerj1_klipper.img
backup-20260228.img here is not a new file — it's the same backup you made of your display during the original install, months or years ago. If you can't find it, you can't use this upgrade path; see the warning above.
No need to disassemble the machine for accessing the EDL button. Download the edl-bootloader and script:
$ wget https://github.com/eazrael/MainsailOS/raw/refs/heads/snapmakerj1/configs/snapmakerj1/scripts/files/lk2nd-edl.img
$ wget https://raw.githubusercontent.com/eazrael/MainsailOS/refs/heads/snapmakerj1/configs/snapmakerj1/scripts/files/boot-edl.sh
then follow the instructions in Reflash the bootloader from a running system
¶ Upgrading from 0.0.4 onward
From 0.0.4 onward, upgrading to a later release no longer requires the original backup or create_image.sh, and no longer requires flashing the whole display storage. Instead, only the linux_boot and linux_root partitions need to be replaced, extracted directly from the new mainsailos.img.
- Download the new installation bundle and extract mainsailos.img as described in "Linux preparation".
- Run split_update.sh against mainsailos.img to extract the two partition images:
$ bash split_update.sh mainsailos.img linux_boot.img linux_root.img
Output:
Images linux_boot.img and linux_root.img extracted. Check output for errors
- Boot the display into EDL mode. If Klipper/Armbian is still running, you can do this over SSH instead of the EDL Booter app — see "Reflash the bootloader from a running system" below.
- Flash the two partitions with edl:
# source bin/activate
(venv) # ./edl w linux_boot linux_boot.img
(venv) # ./edl w linux_root linux_root.img
- Disconnect the USB cable and power on the printer.
¶ Community Configurations
Community members have published improved macro sets and modules. Feedback and testing are welcome there as well:
- FranckFG62/J1s-Klipper-Macros — reworked macros and configuration: stealthchop for quieter steppers, Z-offset macro for the left toolhead, automatic COPY/MIRROR mode selection based on the plate name in OrcaSlicer, simultaneous purge line for both nozzles, nozzle cleaning and speed/acceleration test macros. Reported to work with OrcaSlicer 2.3.2.
- Deskwared/Klipperized-Snapmaker-J1-Macros — macros and guides, including X/Y offset calibration using the stock homing cavity and Z offset calibration using the right datum point.
- elkarto/klipper-filament-adc-sensor-snapmaker-J1 — Klipper module for the J1 filament runout sensors (experimental, code review and testing welcome).
¶ Build your own OS images
You need a linux machine, docker, bash and the gcc-arm toolchain (mainly for lk2nd).
The images are built from the following Github repositories and branches:
| Repository | Branch | What |
|---|---|---|
| https://github.com/eazrael/klipper4j1 | master | Build script build/build.sh |
| https://github.com/eazrael/lk2nd | snapmakerj1 | Bootloader |
| https://github.com/eazrael/armbian-build | snapmakerj1 | Armbian base image for MainsailOS |
| https://github.com/eazrael/klipper | snapmakerj1 | Klipper for the Snapmaker J1 |
| https://github.com/eazrael/MainsailOS | snapmakerj1 | MainsailOS, needs Armbian image + Klipper |
To build everything
- Clone the klipper4j1 repository
- Create an empty build directory, switch to it
- Call build.sh from your empty directory
- You will find the mainsailos.img and lk2nd.img in your build directory
Example:
$ git clone git@github.com:eazrael/klipper4j1.git
$ cd klipper4j1
$ mkdir mybuild
$ cd mybuild
$ bash ../build/build.sh
... wait ...
Sometimes the Armbian or MainsailOS build fails with an error that no free loop device can be found. Just try again.
Depending on your system setup, root may be required, so you may need to call it with sudo or as root.
¶ Making changes
The easiest way to build images with your own changes: clone the affected repository from the table above, make your changes on a branch, then point build.sh at your repository and branch (edit the repository/branch in build.sh accordingly) and run it as described above.
Note: git also accepts a local filesystem path wherever it expects a repository URL, so you can point build.sh at a local clone (e.g. /home/user/klipper) instead of a Github URL — useful for iterating on changes without pushing to a remote first.
¶ Further Development
Not much planned by me. Network printer discovery maybe, or using windows/mac for flashing.
¶ Recovery
These steps are normally not needed. Use them if you cannot use the EDL Booter app, or if you need to recover the printer after a failed flash.
¶ Manual EDL entry (disassembly)
If the EDL Booter app cannot be installed or run (e.g. no working touchscreen), you can enter EDL mode the original way, by opening the printer and pressing a test button/pad on the display PCB directly.
You can follow the disassembly instructions in the Snapmaker Wiki: https://wiki.snapmaker.com/en/snapmaker_j1/troubleshooting/touchscreen_replacement_guide
First remove the floor plate of the print chamber by removing all the screws visible from above. AFAIR there is one hidden beneath a sticker. You should see the mainboard and the PSU.
Remove the front bracket and open the display case by removing two or four screws, one beneath the QC sticker. You should be able to remove the back cover from the front display and see a black bracket on the back of the display. Be careful with the WiFi antenna.
There should be no need to remove the front cover of the display, it's glued to the display, so try to avoid removing it. Please also do not disconnect the flat flexible cable (FFC), mine broke while doing so.
You need to be able to press the button in the upper right corner of the following picture.
There is a board version with different layout and this button missing, but connecting the pads labeled 1V8 and UBOOT/BOOT should do the same.
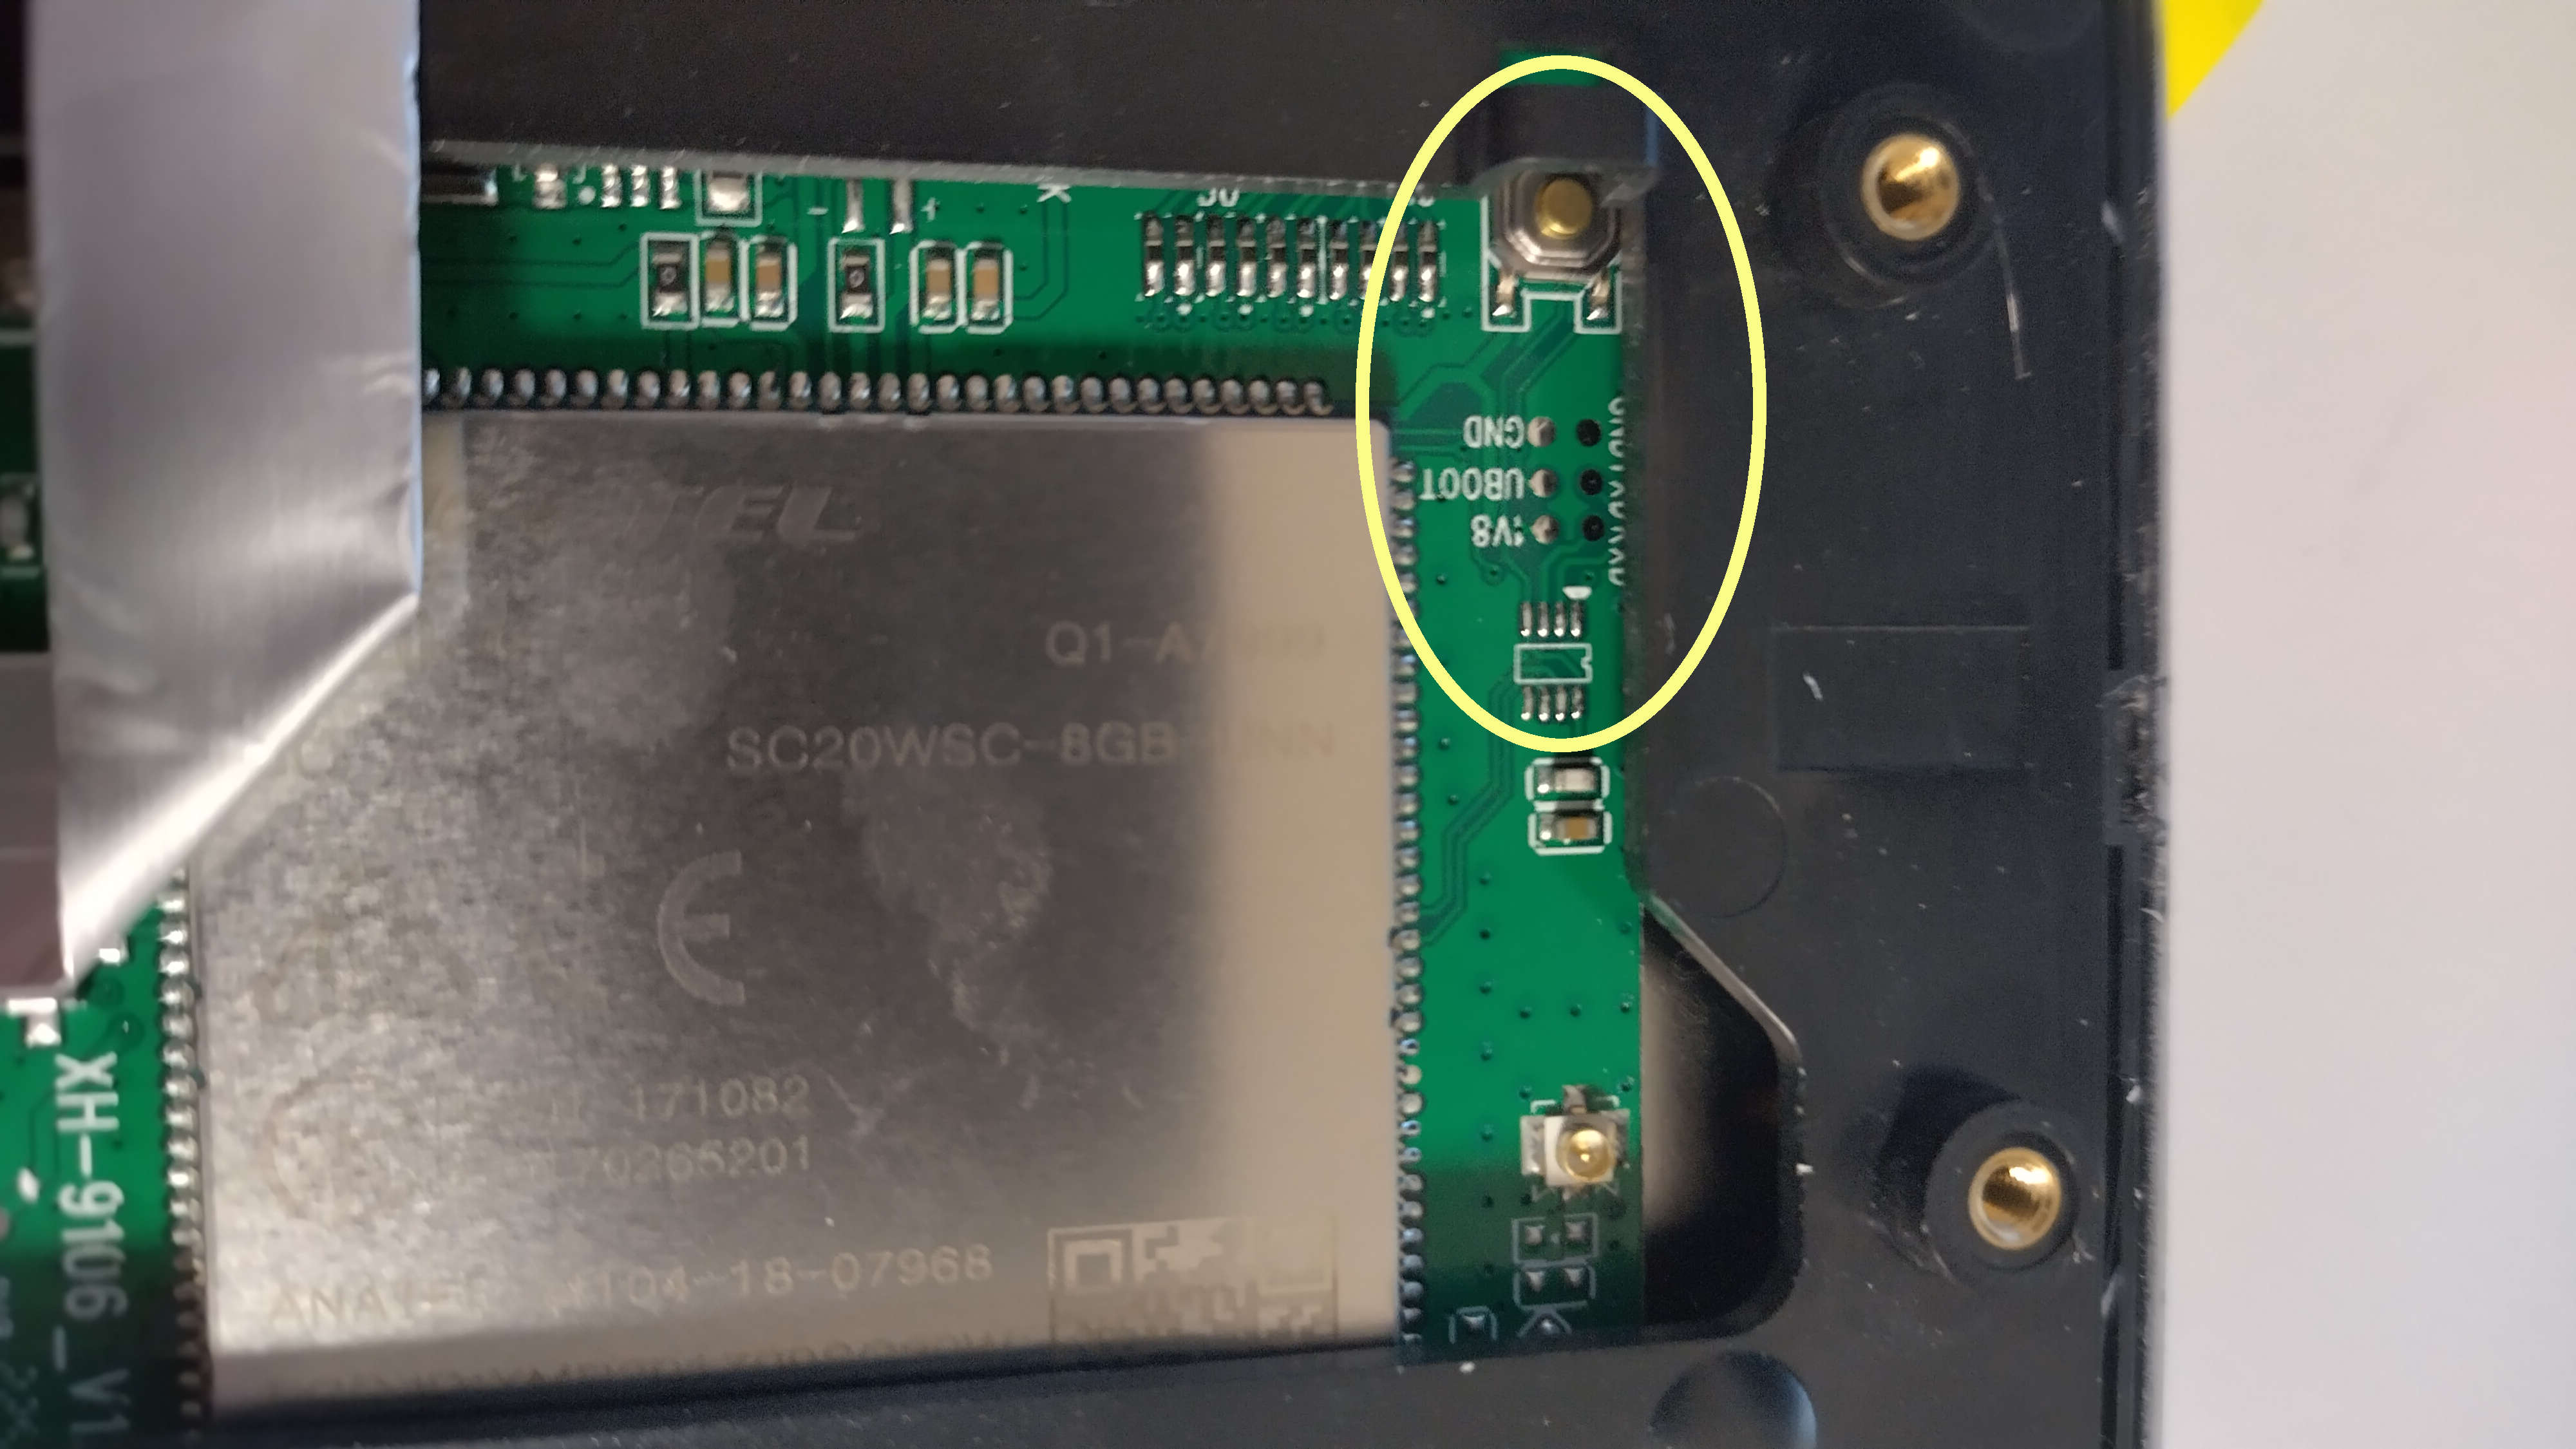
EDL-mode button and test pads
The J1 should be powered off. Plug one end of the USB-A to USB-A cable in your Linux computer. Keep the EDL button pressed (or short/connect the 1V8 and BOOT/UBOOT pads) and plug the USB-A into the front USB of the J1. This will power on display, mainboard and possibly the chamber LED (total power draw ~1.5 Watt), wait 2-3 seconds, the display will stay black. You can release the button. Continue with the "Install display image" section above (check with lsusb, backup, flash).
¶ Reflash the bootloader from a running system
If the printer is already running Klipper/Armbian and you need to reflash the lk2nd bootloader (for example after a failed lk2nd update), you can do so without disassembly or the EDL Booter app. SSH into the printer and run, as root:
# cd ~/edl
# ./boot-edl.sh
This writes lk2nd-edl.img, an lk2nd build patched to boot unconditionally into EDL mode, directly onto the boot partition and reboots the display straight into EDL, ready for reflashing as described above. Only use this if Klipper/Armbian is still bootable; if it is not, use the manual disassembly method instead.
If you do not have network access and the display is showing KlipperScreen, press Ctrl + Alt + F1 to access the console.
¶ Notes
¶ Disable Linux debug output
In images version 0.0.4 and earlier, the Linux kernel logs any kernel messages to the internal serial port which may also stall the serial bus used by klipper for a short time. This can lead to these "Timer too close" errors. Version 0.0.5 of the image has it already fixed, but older versions can use a small work-around.
Edit the file /etc/sysctl.d/99-sysctl.conf (e.g. sudo nano /etc/sysctl.d/99-sysctl.conf) and add the following two lines to the file
kernel.printk="3 4 1 3"
kernel.sysrq=0
then reboot. This should to the trick.